Comb and Foundation
Embedding Tools
Embedding Board
Wiring Frames for Unwired Foundation
Making Foundation Presses
Foundation Presses
Composite Foundation
|
|
|
|---|
|
Comb and Foundation Embedding Tools Embedding Board Wiring Frames for Unwired Foundation Making Foundation Presses Foundation Presses Composite Foundation |
Herring Beeswax Foundation Making Method |
|---|
This page is a combination the wording of the original Herring leaflet and information generated by myself.
The cell size that this method produces is 5.6 mm. I did use my plates to make some brood foundation some years ago, but I found the leaf press more productive and so I relegated my 'Herring plates' to the job of making section and cut comb foundation (which they do admirably).
Making blank wax sheets suitable for embossing can be achieved by one of two methods:-
This method is the one that I use and requires a special double tank with the inner part containing molten wax and an outer water bath, containing release agent rather than water, that warms the wax and keeps the dipping boards wet. This also serves to re-warm and lubricate the plain sheets when they are about to be embossed.
|
(Ensure that the plywood used is 100% waterproof) | |||||||||||||||||||||||||
|---|---|---|---|---|---|---|---|---|---|---|---|---|---|---|---|---|---|---|---|---|---|---|---|---|---|---|
The strip of timber across the top is merely there to act as handles. The main panels are of 9 mm plywood which is thick enough not to warp and gives a certain amount of weight to the item, which makes the dipping easier.
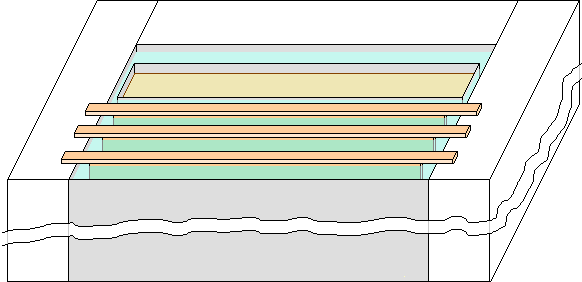
The double tank
|
Shown here with slabs of expanded polystyrene insulation around three sides for clarity, but in practice all sides should be insulated. (see note about additional draining section) There is a heating element on the bottom surface of the tank and a thermostat is incorporated. The thermostat is set by trial and error as the wax temperature does not seem to relate to the dial setting. |
|
|---|
Thermostat is set higher than required for keeping the wax just molten as the liquid wax temperature is depressed by the constant addition of small chunks of fresh wax. The chunks are made by smashing wax blocks that have been left out of doors when it is frosty... A smart blow from a hammer is then all that is needed. I make sure that all chunks are smaller than the top joint of my thumb so that they melt fairly quickly.
NOTE If I were making this tank from scratch... I would add an extra section to the front so that next wet board to be used had a place to drain, and cool slightly, whilst the first was being dipped. The third board would be 'in soak'.
To use the dipping board method it helps to have several boards so that the ones that are not being dipped can be kept wet in the front section of the tank. Take a wet board... shake any loose water from it and dab the bottom of it on a towel to remove excess water. Dip it in the molten wax to within a couple of millimetres of the top handling strip, withdraw it and allow to cool for a few seconds repeat the dipping and cooling until sufficient thickness of wax has built up. (With the temperatures that I use it takes four dips for 'normal' thickness or two dips up to the red line for making cut comb foundation.)
Whilst the wax is still warm and 'cheesy' trim all the wax from the three edges of the board with a smooth, but blunt, knife (I use an old dinner knife). The two resulting sheets of wax can then be peeled from the wet plywood and stacked with paper between them to prevent fusion. The stacking also helps to keep the sheets warm for the embossing stage of the process.
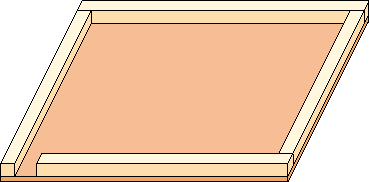
Pouring traysThis method requires several wooden trays and is the one that Mr. Herring himself used to demonstrate. The trays need be kept wet in some way, but the double tank is not required. The dimensions of the inside of the tray should be the same as the dimensions of the dipping boards in the table above. |
|
|---|
To form a sheet in a tray requires a large container full of molten wax and a 'cheap' plastic jug from a supermarket. The trays need pre-soaking in water for 24 hours prior to starting the process. Take a tray and allow excess water to drain from its surface, dip the jug in the wax and pour a generous amount into the tray. Place the jug safely on a suitable surface and, using both hands, roll the molten wax over the entire inner surface of the tray and pour back any excess into the melted wax reservoir. As the wax solidifies take a blunt knife and run it around the inside angles of the tray rim, peel off the waste wax from the rim then remove the sheet itself. You can stack this sheet and repeat until you have a pile to process or you can place the still pliable sheet between the embossed plastic plates (brushed with release agent) and pass it through your wringer to produce a fully embossed sheet.
However your sheets of foundation are produced they should be stacked with interleaved paper and allowed to cool to a 'normal' room temperature before they are trimmed to final size... This is because a considerable amount of shrinkage will occur and if the trimming is done with the wax too warm the sheets will end up undersized when they finally cool down.

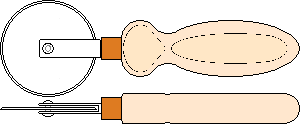 The wheel type pizza cutter is used to trim the oversized
sheets of finished foundation to exact size, simply because prolonged
and repetitive use of a knife wears away the edges of the template
which then produces sheets that are too small to fit the frames properly.
The wheel type pizza cutter is used to trim the oversized
sheets of finished foundation to exact size, simply because prolonged
and repetitive use of a knife wears away the edges of the template
which then produces sheets that are too small to fit the frames properly.
Templates for final cutting will depend on the exact nature of the frames that you use. I have several... Some are steel and some are aluminium. They are rectangular in shape and are not illustrated, apart from one that has a profile for a special purpose that is shown at right (the hole is for hanging on the wall and the intricate shape enables the foundation to be fitted into 1/3rd width mating frames).
I do this job in winter... I use a room with the radiator thermostat set 'flat out' and I have an electric fan heater running at two kW as well, which makes the room uncomfortably hot for most people, but it allows all the equipment to be at a high temperature (approximately 40° C which keeps the wax sheets pliable... So pliable in fact, that they are in danger of sticking together which means I have to interleave each plain wax sheet in the stack and each sheet of finished foundation with tissue paper. The tissue paper gets soggy with release agent, but dries out in a crinkly fashion and can be saved for re-use. The crinkled nature helps to allow air flow for cooling of the finished, but untrimmed, sheets which otherwise can take several days to cool.
Release agent the original text calls for "Stergene", but I use washing up liquid (any brand) and I add a dash of lemon juice as well for acidity (I also like the smell). The Herring leaflet calls for 40 ml of detergent per gallon of water, but I merely add enough to make the water feel 'silky'.
This is called a mangle in some parts of the country.
The wringer should be firmly clamped to the table and as the plates are fairly long, you will need adequate space for the plates to exit from the rollers. You also require enough space for several stacks of wax sheets and finished foundation.
With the two plastic dies facing each other and the guide holes at the same end place a wax sheet between them, dip the wax sheet in warm release agent to slightly soften the wax or if your conditions are warm enough brush the plates with the release agent using a paintbrush, then put through the mangle. Open up the dies and peel off the finished foundation and stack for later trimming.
The two plastic sheets are self aligning simply due to the geometry of the pattern, but there are a pair of holes in the leading edge of the sheets that makes alignment foolproof.
There are many variables in this process and you may need to experiment with timings, temperatures, roller pressure, release agent concentration and number of dips, to get consistent results. For instance... Not mentioned in the text above, but in my very warm conditions I make the first dip on the first board and then suspend it on two pegs to cool. After that I dip the second board for the first time. Then I then swap this for the cooled one on the pegs and do the second dip, again swapping and second dipping the second board. This alternate sequence is necessary because the hot conditions slow down the cooling rate. The variables may lead to some wasted time on your first attempt, but please do not be put off by initial failure. Perseverance and practice will enable you to become quicker and the process becomes enjoyable as you get better at it. The hot working conditions are also a boon to sufferers of arthritis and joint pain.
Dave Cushman.
Page created 21/12/2001
In the above, Dave Cushman describes the later method that was two plastic sheets, both embossed with the cell shape on the mating faces only. They were hinged on one of the short ends, so you opened them up, placed the thin sheet of wax inside, then run through the wringer, with the hinge leading. There were several versions, with different hinge arrangements. This method could make BS brood size foundation. There was an earlier method, where one sheet of embossed plastic was fixed into an aluminium tray. The molten wax was poured into the tray, then the surplus drained off and the sheet of foundation was removed from the tray. This was only embossed on one side, although the other side had a hint of pattern. These were BS shallow size only. This was rather difficult to use until you got the knack of it. What I found was that if you poured into one place in the tray, it soon heated up, so the foundation was thin in this place and the release agent didn't work, presumably because the water turned to steam. I have both types in both drone and worker base. With a bit of patience, I can get good combs, but the foundation is very brittle and needs to be kept very flat from the time it is cast or rolled. R. P.
Page updated 29/11/2022
Written... 21 December 2001, Revised... 24 December 2001, Revised... 13 August 2002, Upgraded... 09 December 2005,
|