Beekeeping Tools
Comb and Foundation
Frame Wiring
|
|
|
|---|
|
Beekeeping Tools Comb and Foundation Frame Wiring |
Embedding tools (for Beekeepers)
|
|---|
(Requires heating over a flame or hotplate.)

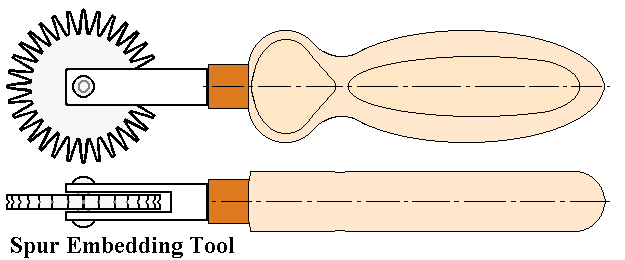
There is a groove around the edge of the spur wheel that allows it to 'ride' along the wire.
This version is often attributed to a man called "Woiblet".A conventional 25 watt soldering iron that works on 220v AC or 115v AC can be modified very easily into a tool for embedding wire, twine or nylon mono filament.
The modifications are twofold:-
The temperature at which a soldering iron normally operates is too
high for our purpose, but a simple modification will halve the power
consumption and thus lower the temperature. The temperature still
needs to be a little higher than the melting point of beeswax as some
of the heat will be transferred to the wire and more still will be
used in melting the wax.
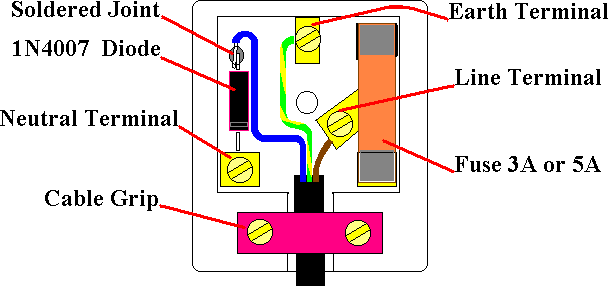
The first modification consists of fitting a diode (type 1N4007... Inexpensive... From a radio or T.V. repair shop). This diode is fitted inside the power plug in series with one of the element leads. A diagram is offered for a type of plug that is available in the UK.
|
If you are unsure how to do the job, then please seek professional advice
(show them a printout of this page). |
|---|
In this particular case it does not matter which way round the Diode is or whether the Diode is fitted in the Line or Neutral leads.

The diagram above shows the diode leads and soldered joint 'bare' this is for clarity only, in practice the joint and any bare copper wire should be insulated with suitable sleeving.
The second modification to our soldering iron is to re-shape the 'bit' to suit our new purpose.

Before Cutting the Groove in the tip the tip should be shaped hemispherical or a blunt bullet shape either by turning or filing, then the reshaped tip should be polished.

Our new embedding tool will take time to get used to... The groove is placed on the 'wire' and travelled along it by dragging... The speed with which you can do this will depend on the angle that you hold the iron, the actual temperature and the thermal mass of the bit. Your first few attempts may produce many holes... I remember when I first tried this for myself it took me about 30 frames to get down to about 2 or 3 holes per sheet. (Some of my first attempts cut the wax to ribbons.) Persevere and you will become more skilled... But even after practicing on several thousand frames I still produce one or two holes in some sheets.
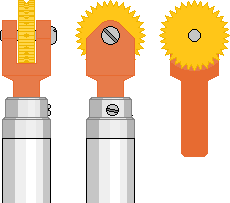
 This is a miniature version of the Wioblett tool, the clevis of which is inserted
into the bit holder of a soldering iron. The large area of the various surfaces serve to
regulate the temperature lower than soldering temperature. I used to sell these when I was
in business, but I never got around to trying to use one, so I cannot comment on the
effectiveness. I expect that after a suitable time on the 'learning curve', enough skill
would be acquired to enable a satisfactory job to be achieved.
The cross section shows how heat transfer is maximised, by cutting the clevis with tight clearance to the edge of the spur wheel.

If metal wire is used it can be heated directly by passing a current through it from a car battery or battery charger. More will be said about this method on a future page that deals with making wired foundation.

 The curved awl is a leather working tool it is modified by
grinding a groove along the outer part of the tip. This allows a
pressure to be applied to the wire whilst the tool is drawn along it,
the pressure is sufficient for the wire to be forced locally into the
thickness of the foundation. The tip of the tool then forces the wax
back partially over the wire to retain it.
It is easier to say than to do, however, practice will allow you to develop the level of skill required, but it only becomes a viable method when electricity is not available. If I were intending to use this method regularly I would carve a wooden handle that could be gripped by the whole hand, as the pressure required is considerable. It helps if everything is warm... Really cold foundation just shatters under the pressure.
This does not work with nylon fishing line as the pressure needed to embed the line is so great that the surface friction pulls and stretches the nylon.
I have developed a fairly easy way of grinding the groove that will be the subject on another 'future page'.
 Another tool based on a soldering iron although not used for embedding, but used
to create a stream of molten beeswax, was fabricated from a Henley Solon 65w device and a
brass cone rolled from 16 SWG sheet brass. The edges of the cone were silver soldered,
the soldering process also blocked the hole at the tip of the cone, this blockage was
drilled though using a 1.2 mm drill bit. The soldering iron tip is solid copper at the
point where the conical hole was bored. The boring was done roughly using
a cone cut and finished to shape using a
de burring tool
as well as various Swiss files. The cone was fixed in position using a couple of small self
tapping screws through into the copper bit. The melt rate of this device was quite high,
the drawing is a little out of perspective, but has been generated synthetically as the
device cannot be found. The melt rate could be reduced by using a diode in the same way as
the other, smaller modified soldering iron. The 65 watt version was chosen, because of
the meaty copper region between the element and the tip and also because one was available
'off the shelf'.
Dave Cushman.
Page created Autumn 2000
Page updated 04/12/2022
Written... Autumn 2000, Revised... 04 March 2002, New Domain... 15 May 2004, Upgraded... 14 August 2004, Further Upgraded... 23 January 2007, Addition... 24 February 2007,
|