Increase
Increase - Summary of Methods
|
|
|---|
|
Increase Increase - Summary of Methods |
Making Increase (method 2) |
|---|
| This method, like others in beekeeping, has many slight variants. (The circular distribution of the nucs as described further down the page is often erroneously thought to be due to Vince Cook, as he promoted it, but was devised by Harry Cloake, a New Zealand commercial beekeeper who Vince Cook worked for.) |
|---|
A few preparations are needed and we have to make a Cloake Board. We also need enough 5 frame (or similar) nuc boxes for the number of Nucs that we finally split the colony into (between six and ten according to conditions).
Note... all the illustrations are of top bee space equipment and are of the type that I use personally. If you use bottom bee space there is no difference to the method.
Our first requirement is a colony on two brood chambers, headed by the queen we wish to breed from. The colony should have plenty of bees, honey and pollen.
This colony may be "constructed" by uniting smaller ones or could have been deliberately produced at the end of the previous season.
The colony should be in such a position that it can have a circle of nucs formed around it (not against a fence).
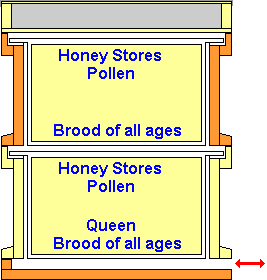 The bees will be fed throughout the operation, as often as needed, so that they
never run out of feed... Sugar syrup at a strength of 1 kilo cane sugar to 1 litre of water
may be used, I prefer to use honey diluted with an equal part of water, but this may
induce robbing and has a risk of fermenting if given in large quantities. If I use dilute
honey, I use a couple of frame feeders rather than a hive top feeder. Pollen is required in
very large quantities... If the bees have not stored enough themselves it will need
supplementing with freshly trapped pollen from another colony, pollen substitute is not as
good as pollen, but it is better than nothing.
The diagram at left shows the conditions that we require at the start of our process. Due care should be exercised to ensure that drones will be available at the time we expect mating. See Grafting Timetable for details.
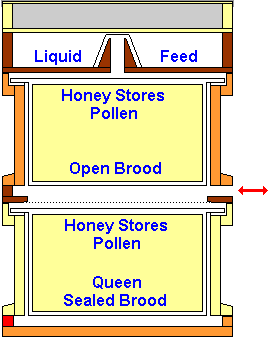 Stage one (Day 1)
Initial Preparation... Turn the hive through 180 degrees so that the entrance faces the
opposite direction. Close this entrance with a solid block of wood. If you are performing
this method often it is worthwhile making a floor that has an entrance at both front and
rear, which saves actually turning the whole box around.
Ensure the queen is in the bottom brood box with most of the sealed brood.
Place the cloake board, without slide, on the bottom brood box with the entrance facing the
original flight line.
Place the second brood chamber on top of the cloake board, this should contain frames with
unsealed brood, honey and pollen (from other hives if needed).
Put a full sized feeder on the top of the second brood box.
And finally a roof on the top of the stack.
An entrance block can be fitted in the mouth of the cloake board during this stage, which
may help with possible robbing. The biggest defence against robbing is the high strength of
the colony.
The entrance is a little higher than before and the queen is confined to the bottom box by
the excluder that is part of the cloake board.
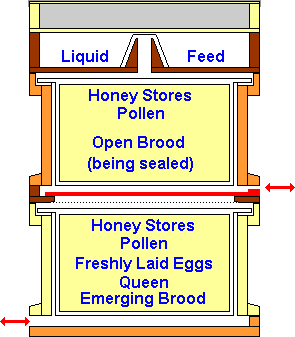 Stage two (Day 7)
Illustrated left.
Seven days later...
Insert the slide, there is still an entrance for the top box after doing this, but the lower
box is shut off for a few seconds, while the block from the lower entrance is removed
thus allowing the confined bees in the lower box to fly.
These bees will return mainly to the top box, which has mostly sealed brood.
Replace an empty or partly stored frame in the top box with the cell frame that will be used
for grafting. This is so that it will be at the right temperature and will be freshly
cleaned up by the bees.
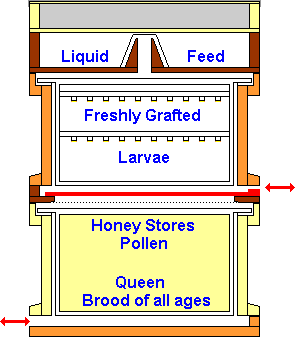 Stage three (Day 8)... Shown right.
After twenty four hours the bees in the top box realise that they are queenless and our
cell frame will have acquired the "right" smell.
Retrieve the cell frame.
Remove a frame containing young larvae from the bottom box.
Graft the larvae into the cell frame and
place the cell frame in the top box, between two frames with stores and plenty of pollen.
Check for queencells and destroy any found. (They would have the "right" genes,
but we would be unsure of the timing.)
Return the source frame to the bottom box.
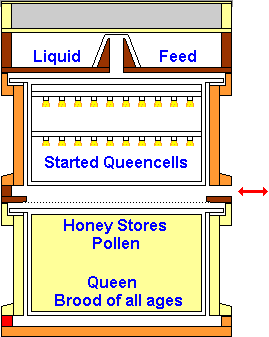 Stage four (Day 9)
(left)
After a further twenty four hours has
elapsed we can return our colony to a queenright unit.
Remove the slide.
Replace the wooden blocker in the lower entrance.
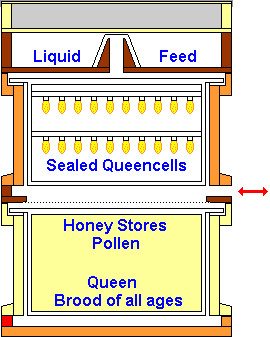 Stage five (Day 13)
After four more days our cells are sealed. We now have seven days until the queens emerge
(Day 20).
Stage Six (Day 16)
Remove the queen and the frame that she is found on.
Place this frame, and any others that can be robbed from colonies not involved in queen
rearing, in a nuc and remove to another apiary.
Stage Seven (Day 17)
We know from the work we did on the previous day
roughly how many frames are available and at what stage they are.
This allows us to estimate the number of nucs that we can deploy by splitting the now
queenless stock.
We should aim for one frame of brood for each and one frame of stores. So we are likely to
get about 8 nucs out of our colony. Drawn comb, sealed brood and stores from other colonies will all help
to bolster these mating units.
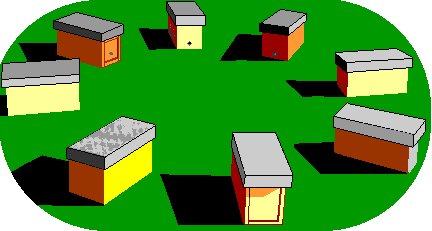
Each nuc should be given a queencell and the group should be set out centered on the site of
the now empty hive, the circle can be anything from 2 to 3 metres in diameter.
Such a scheme results in roughly equal distribution of bees among the nucs, which are free
to fly at all times.
 Reliability is a strong feature of this method.
The quality of queencells is high and they are all of the strain that we have selected.
There is very little "messing about" with the bees and so stress is kept to a minimum.
Versatility... The number of queens produced is adjustable between twelve and forty, so as well as producing a number of nucs for increase there can be some other queens for requeening other stocks. Other colonies may be split into nucs, by the circle method described, to take such excess queens if further increase is desired. The number of queencells that can successfully be raised will depend on the weather, the strength of your colony and the amount of pollen that you feed... 25 is about the maximum for normal British conditions. In areas with better weather and using larger framed equipment then you may achieve the forty that are claimed by some. (My best effort was 28 cells grafted, 23 queencells, 22 virgins, 17 mated with 1 quickly superseded.)
If the queens are only required for requeening other colonies the queen producing colony is a strong unit that is still capable of honey production after it has done our queen raising for us.
The two brood boxes that are used in the queen rearing operation can be utilised to take two of the nucs (the empty spaces being filled by spare comb or frames of foundation).
If the queencells are intended for mating nucs produced by other means then the whole process may be repeated, after a few days for recovery, with a batch of sealed cells being available every fortnight or so. However prolonged use will result in a certain amount of brace comb developing in the space within the cloake board.
This method may seem complex, but it is actually one of the simplest and least labour intensive that I have used. The only failures that I have had were as a result of poor weather not allowing good mating.
D.A.C.
Printed from Dave Cushman's website Live CD version
Written... Sometime during 2000 or early 2001, Upgraded... 08 August 2005, Further Upgraded... 31 December 2007, Revised... 03 January 2008,
|