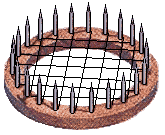
This method of marking is employed when an unmarked queen is in a full sized colony.
It is used with the prongs on the surface of capped brood, unfortunately, a few pupae may be damaged by the prongs, but this is a small price to pay for a simple method.
The spacing between the prongs is large enough to allow workers to escape, but the queen has a larger thorax and thus is captive. She is immobilized by pressing the cage down until she is gripped by the soft and compliant mesh. When she is still, it is an easy matter to dab on paint or cement a numbered disc to her. A few moments delay to allow the paint or cement to dry and the cage is withdrawn.
There is an international colour scheme in use for marking honey bee queens...
Yellow is used when a year ends in 2 or 7.
Red if a year ends with a 3 or 8.
Green when 4 or 9 is the last digit.
Blue if the year ends in a 5 or a 0.
What You Rear Green Bees?
Then all you have to remember is 1, 2, 3, 4, 5 and you will never need to consult the book again!
There are also coloured discs and numbered discs with coloured backgrounds. Grey is occasionally used instead of white. I have used quick drying silver paint sometimes, as this is very 'visible'.
I often use numbered discs that I cement in place using coloured lacquer as glue. The colour of the lacquer gives me a batch code. My list of batch codes is:-
brown = 1, red = 2, orange = 3, yellow = 4, green = 5, blue = 6, purple = 7, grey = 8, white = 9, black = 0 (10).
I also had a lurid lime green and a lightish lilac colour that were used in place of any colour that I had run out of. My batch marking code is that used in identifying electronic components and it led to an error recently... I was convinced in my mind that my list agreed with the 'normal' one at the figure two... I was wrong yellow is two,
there is no equality at any number in the two systems.
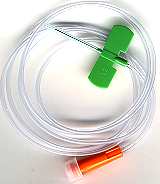
The discs are small and difficult to handle with clumsy fingers... An easy way to have them ready for the instant that you require them, is to put one end a piece of thin tubing in your mouth place the end of the tube on the top surface of the disc then apply suction with your mouth. The disc will stay in position and can be allowed to dangle ready to be applied when you have dotted the adhesive on the queen. This suction method can be applied to picking queens from combs, but you will need a slightly greater diameter of tubing. The soft PVC tubing I use for number pick up came from a surgical 'butterfly' (picture at right) which had a piece of tubing 900 mm in length and 1.8 mm diameter. For picking up queens a piece of silicone rubber tubing, about 3 mm in diameter, can be utilised (obtain from medical suppliers). Plastic tubing can be used providing a silicone rubber cuff is added to the business end.
The following description of using the tube cage has been lifted from an Email to the 'Irish List' sent by Brian Cramp.
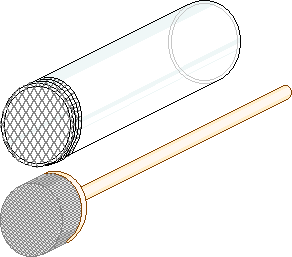
The tube cage, this is better when using the glue and numbered discs, as you can take the queen away from the hive and buzzing bees to mark her, with this cage you can also clip one wing at the same time. The cage consists of a 30 mm glass (or plastic) tube about 80 mm long with a 5 mm sq. elastic mesh stretched over one end and held in place with a rubber band, a 28 mm plunger covered on the top with a 9 mm thickness of soft plastic foam. To use it the queen is captured in the open end of the tube and the plunger inserted into the mouth of the tube, to hold her captive. Cover the brood box to keep the bees happy while you take the queen away to mark her, prepare the glue and disc then push the plunger up to trap the queen against the mesh with the dome of her thorax through a mesh hole to mark her. If you also wish to clip a wing, you can twist the plunger slightly and one wing tip will poke through the mesh, cut off about 4 mm and the job is done. Withdraw the plunger about 25 mm the queen will walk about un-harmed wait a few minutes to let the glue or paint dry, pull the cover off the brood box place the tube along a seam between the frames, pull the plunger out, and let the queen walk out and down on to the comb.
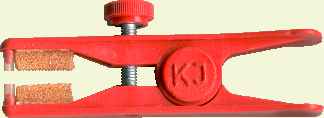
Karl Jenter manufactures this plastic device that resembles a clothes peg, they call it 'queen pliers', I prefer 'queen tongs' (Jenter call them "tongs" on their website on 16/12/2022, so they probably did listen to Dave Cushman! R. P.) , which sound a little less brutal. This has soft sponge areas for gripping the queen's abdomen and small, stubby, transverse silicone rubber tubes that grip the sides of the queen's thorax. I have one of these items myself, but I have never used it, (it came with other items along with a cell plug box). It is spring loaded and the 'grip limit' can be set using the thumbscrew.
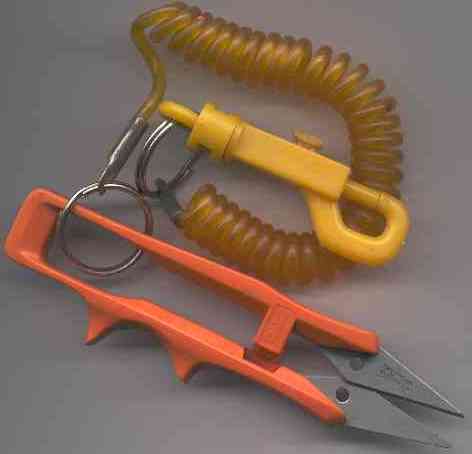
The snippers themselves are intended for precision cutting of sewing stitches and are known as stitch snippers. The curly cord is available from baby shops as they are expected to be used to secure babies dummies so that they do not get lost.
I find that a safety pin in my bee suit just below my right shoulder allows the coiled tether to extend to a position that is easy for my right hand to grasp.
The closeness of contact between the edges of the two blades is easy to sense so that a crisp, clean cut may be made.
They are only suited to right handed use, unless a left handed person develops an upward cutting motion.
My Method is right for me because I have small, soft hands. Those with large stubby fingers and hard dry skin may have difficulty holding the queen's legs with sufficient sensitivity. I suspect that this method is best suited to the ladies.
I use elasticated calico cuffs and no gloves, although the top quality surgical gloves may be suitable, this is one occasion that the extra sensitivity of bare flesh is needed. I have been stung by a queen (once only), but it is very, very rare for this to happen. You will also receive the occasional sting from a worker whilst performing this operation.
I should say that I normally perform clipping and marking on queens that have just started to lay, in the nuc that they were mated from. Such nucs have few bees and have an adequate dosage of queen pheromone to keep them calm.
Step by step (assuming right handed)
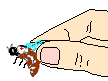
Using your right hand, pick the queen off the comb using thumb and forefinger to grip both pairs of her wings... as shown left. An even more detailed description of the 'picking up' method is given on the page Picking up Queen Honey bees.
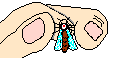
Then point the forefinger of your left hand at your right shoulder, keeping your hand up towards your face at a comfortable distance for good vision. (Illustrated at right.)
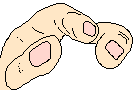
Offer the queen towards the tip of your left index finger and she will grip it with all six legs. Now gently close the tip of the left thumb and the side of the second finger onto the queens legs. You may now release the grip of your right hand (left picture).
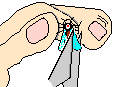
Dab on your marking paint
or glue your
numbered identification disc in place.
Then while the paint dries... do the clipping operation.
Aim your left hand at an angle as if to miss your right shoulder then slightly lift the queen's right wing with the tip of the lower blade of the snipper, position the blade so that about one third of the wing will be amputated. After ensuring that there is no spare leg involved and that the blades are perpendicular to the wing surface... complete the cut. Do the marking first particularly if using fish glue, to attach numbered discs, which requires a slightly longer drying time than paint.
Some texts advocate the use of surgical scissors to perform this cut. But such scissors are not so easy to keep sharp and do not give the operator enough 'sensory feedback' to ensure perfect blade contact throughout the cut and as a result can cause tearing rather a clean cut.
I have never marked unmated queens, as I think the risk of non acceptance is higher as the virgin will be perceived by the bees a 'defective', they are less likely to pay her the attention she needs and may well supersede her quickly... See page on Induced Supersedure which also has links to other similar pages.
It has been suggested by some that the hands should be swabbed with alcohol between marking one queen and picking up another, to avoid the transfer of the 'smell' of one queen to the next. I have marked and clipped queens, around thirty at a time, sequentially, using the method shown above. I did not wash my fingers between queens and I do not recall any problems. The mating nucs contain small frames that are of such a size that the total frame area is about equal to one LangstrothLangstroth deep frame. with 1000 - 1500 bees. Thus, what queen pheromone there is, is spread relatively thickly over a small quantity of bees.
Printing method... I have heard reports of some paint markings only lasting for two years or so. There are two reasons for this, one is paint quality, but the other is a little more subtle. The thorax of the queen is not totally smooth and does have some hair on it, applying paint using a small brush only wets the tips of the hairs and the bulk of the paint does not penetrate to the carapace. The workers are able to nibble away at the paint and slowly remove it. To avoid this you need to 'print' the mark using the end of a wooden match stick or similar, applying the paint in this fashion makes it penetrate right through the hair to the carapace itself.
Dave Cushman.
Page created pre-2011
Page updated 16/12/2022