
Cell Plug Boxes for Raising Queen Cells
Describing Jenter and Cupkit (Cupularve) types
Many beekeepers find grafting difficult, and as that is the most common method of raising queen cells, therefore seen as the simplest, they often give up the thought of rearing their own queens. Cell plug boxes are a
simple way of achieving the same result, but without touching the larvae in any way.
Worldwide there are many different types of cell plug box. I describe the two most common types:-
The Nicot "Cupkit" System.
This is made in France and available from several UK appliance dealers. It is only known as Cupkit in the U.K and
Ireland. Elsewhere it is known as "Cupularve".(There are many copies available online, also called "Cupkit", but I found they are often slightly different sizes, so incompatible, often
in the same pack. I accept they
are much cheaper, but the annoyance caused probably isn't compensation for the "saving". R.P.)
The Jenter System.
The origin of this type is Germany. The manufacturer's website can be reached
here.
For reasons of which I am uncertain the Jenter system seems to be slightly more popular.
The principle of both systems is the same. There is a plastic box with false "cells" the queen lays in. She is confined by a plastic queen excluder. When she has laid up the box, or enough eggs for your needs, she is removed. Some leave her until the eggs have hatched, but I have found on more than one occasion that the bees have removed the eggs and the queen has relaid in the cells. I have not heard this from anyone else though.
The base of the "cell" is a small plastic insert that is removed from the box with the young larvae in it and placed in a holder. This is fixed to a bar in a frame and put in the cell raising colony, for the bees to convert the larvae into queen cells.
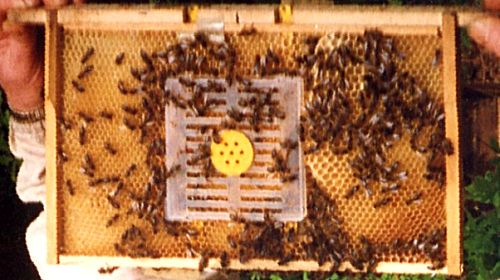
The cell plug box is fitted in a frame in some way, both methods suggest cutting a hole in a comb, but alternatives can be found below.
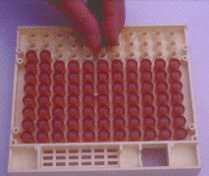
Nicot Cupkit (Cupularve)

The large illustration shows the small brown cell cups (detail immediate left) being loaded into the back of the comb box. The spigots onto which the cups are placed are the tubes that simulate normal cells. These "cells" are accessed by the queen from the front compartment of the box wherein she is trapped by a queen excluding plastic cover.
As the queen lays her egg it is deposited through the artificial cell on to the inner surface of the brown cell cup, which effectively forms the cell bottom.
The full box in the Cupkit system has 110 "cells".

Here is another view, this time of the front of the box, that shows some of the accessories (further pictures of the components are available on the Plastic Bits page).

Jenter System
The Jenter comb box is organised differently to the Nicot Cupkit version with holes at the base of part depth plastic cells that the small brown plugs fit into. The full depth of cells is achieved by the white hexagonal plastic grid that act as a spacer and forms part of the cell walls.
Parts associated with this system are illustrated below.
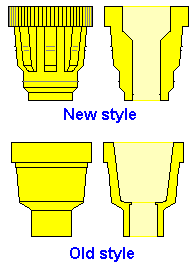
Whilst originally designed for holding Jenter cell cage two part cell plugs for cell starting and finishing, these plug sets are versatile and can be used for ordinary grafting.

The Jenter Cell Plug System has the cell base only on the removable plug.

The cell is formed by fitting the plug into one of two types of collar. This is the old profile which is smaller internally. The mouth is 8.5 mm diameter.
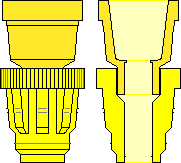
A little trick that can sometimes be useful... The older type will plug into the rear of the newer type.
This tip came from Albert Knight.
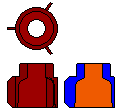
The second type of collar has three "wings" which make it easier to handle. The internal profile is more parallel sided than the smaller version and its mouth is 9.5 mm diameter. I am concerned that this alteration in shape and size is a further manifestation of continuous cellsize enlargement.

The plug and cup form a complete unit that then fits into the yellow plugs illustrated above.

The action of the queen laying an egg is shown in the illustration at right.
In order that the transparent queen excluder grid can be readily seen, the image is rendered against a grey background.
The full box in the Jenter system has 90 "cells".
Information for Cupkit and Jenter systems
Mounting the comb box in a frame... Each kit comes with instructions and these will generally say to take an empty used, but sound comb and cut away a central portion to accept the comb box
When I first used cell plug boxes I fitted the box into a new frame and trimmed foundation to fit around the box. To get this frame drawn and to ensure that it was cleaned and accepted by the bees I placed it in a box of foundation frames that were being drawn out by a swarm. I also left off the front and rear covers so that the bees could clean up the inside of the rear compartment of the box.
After a few seasons of using the comb boxes in this fashion I inadvertently left one in a colony for several weeks and the bees filled it solid with honey which then crystalised. This was then ignored by the bees when I tried to get them to eat the contents.
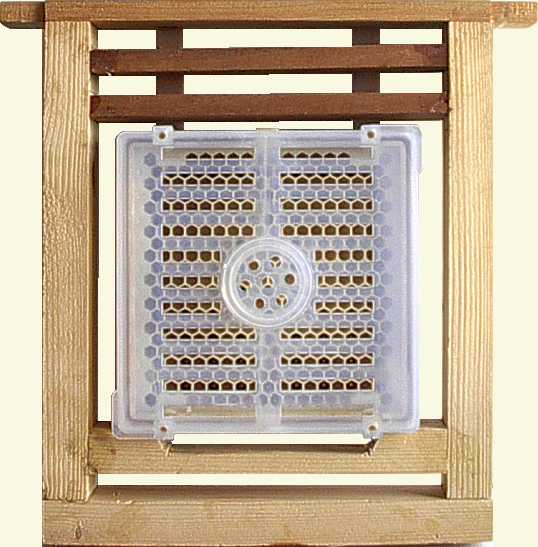
As a result of this event I resolved to alter my system so that the comb boxes were mounted in
half width frames and to fit out the unused space with wooden
strips to form a labyrinth that would be transparent to bees, but would not provide any space for comb building. The smaller
frames can be introduced into a colony with full sized frames by means of an adaptor frame and the smaller frame will
fit many of my nuc boxes and mating nucs giving greater flexibility of use.
The picture at right is a frontal view of a Jenter box fitted into a half width B.S. National frame... The spaces are all too narrow for comb to be built, but render the comb box itself easy for bees to reach from any direction.
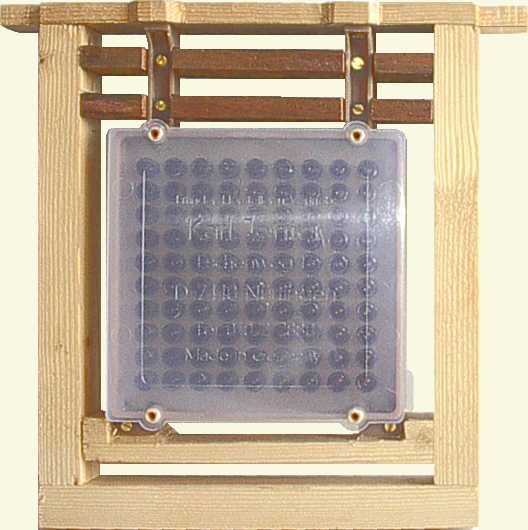
The rear of the cell plug box can be seen in this view and the method of fixing can also be readily seen.
The comb box itself is much thicker than the wooden frame (which is 28 mm wide) and so the two projections on the top bar ensure that the frame hangs vertical if it is pushed up against another frame.
The frame lugs are reduced to 22 mm width in order that they may fit into the sheet metal
castellated spacers that I normally use in my nuc boxes.
The external dimensions of the woodwork are the same as given on
half width frames page.
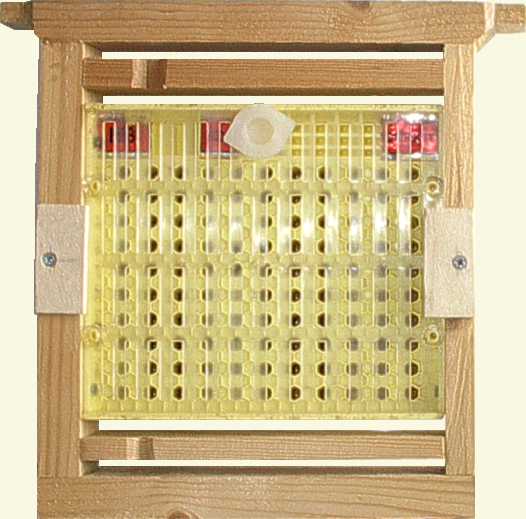
The size and shape of the Cupkit version of the comb box is rather different, but the labyrinth principle is still used in order to obviate the possibility of comb being built.
The thin plywood retaining toggles are used to keep both the front and rear covers in place. This would not be required with new equipment, but the example shown had already been in use for twenty years at the time that it was re-built into this frame and the retaining action of the pegs had become non-existent as the plastic parts had worn over that period.
The bee ways in this frame are only 6 mm wide, but this does not seem to hamper the bees in any way.
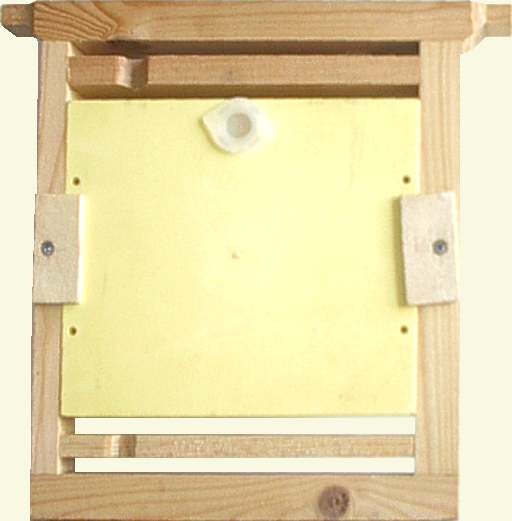
If I were to make more of this type of frame I would probably arrange for one 9 mm bee space at the top and sort the thickness of the wooden strip across the bottom so that there were two 9 mm bee spaces under the comb box.
The notches that can be seen in the horizontal strips are merely to aid the passage of bees between the spaces.
There is no significance in the fact that the side bars are of different thickness (other than materials available at the time). If batch construction was envisaged I would cut side bars to exact and equal thickness.
The prepared frame should be given to the bees 24 hours or so prior to it being needed for use so that it comes up to temperature and the bees can "condition" it to their liking.
Cleaning of cups after use as human beings we tend to think that nice shiny objects are 'clean' I used to go to great lengths using surgical spirit and cotton buds to remove wax and propolis from cups and cell plugs as well as the stale royal jelly from their interior.
Albert Knight mentioned getting better initial acceptance of used cups by leaving them 'dirty' (he use the word 'grotty'), just removing any dried up lumps of royal jelly and letting the bees themselves be the final arbiter on cleanliness.
After Albert had said that he was getting better success by leaving the cups 'dirty', I experimented using a pudding basin with hot water in it, this had a small piece of brace comb melted in it so that the wax formed a sort of scum on the water surface, dipping the cups through this film allows them to pick up a small amount of it, which when the cups are given to the bees, gives them an incentive to clean, which they do admirably.
The definition of 'cleanliness' that bees use is obviously different to the human perception.
Originally written by Dave Cushman. Edited and additions by Roger Patterson.
I have used both Jenter and Cupkit many times with equal success. I slightly prefer the
Cupkit because it has one less part and as an engineer I think the design is slightly better. There are one or two other
products that are made to fit Jenter, not Cupkit, but this isn't a problem to me.
I find it easy to graft any rejects into both Jenter and Cupkit and I know several beekeepers who use the cell cups to graft
into and don't use the box.
Those who are fussy about cleanliness can easily wash parts in a washing soda solution, but like Albert and Dave, I just
clean out the residual royal jelly. I use an ice lolly stick that is shaped. They are made from hard wood and do the job well
without causing damage.
When purchasing these kits, remember that some parts are round and will roll off a work surface. I would buy some spares.
I have heard beekeepers complain about the cost of these kits, but you can raise many queens and I think they are good value.
There is no handling of the larvae and that is a bonus to some who have difficulty grafting - many do. For teaching purposes, I
use several methods of cell building and I thoroughly recommend cell plug boxes because they are easy to use.
I started to use the Cupkit before I saw this page on Dave's website, but like him, I saw a problem with cutting a hole in a
comb to place the box in. I thought the bees would fill the comb with honey. Interestingly I found a similar answer to Dave. I placed the box to one side of an old standard
B.S. brood frame, then nailed
thin strips of wood with gaps between to fill up the space. I spaced them with a pencil. This allows beed to move freely, but they don't fill in with comb.
I like this system and I think it would suit anyone who requires a reasonable number of queens, but probably not for those
who need large numbers. One drawback for the small-scale beekeeper is that all the larvae will come from the same queen, where with
other methods they can come from more than one.
As with other methods of queen rearing, you need to be able to see small larvae, but the failure to do so is nothing to do
with the system.
Roger Patterson.
Page created pre-2011
Page updated 31/12/2022


